First time at MonkeyTaco? This post builds on Your Laptop Is Already a Robot. You don’t need to read it first — but if something looks unfamiliar, that’s a great place to start.
Let’s be honest about something.
In the last post, we built a robot that could look at the world through a webcam and identify everything in front of it. Person. Coffee mug. Cell phone. Laptop. Dog.
Pretty impressive, right?
Well. Yes and no.
Because here’s the thing — a robot that silently labels objects on a screen and then does absolutely nothing about it is, technically speaking, useless. Nobody needs a robot that stares at you, recognizes you as a “person,” and then just… sits there. That’s not a robot. That’s a very expensive mirror with a caption.
In this post, we fix that. We’re going to teach our laptop robot to react — specifically, to greet anyone who walks in front of the webcam with a cheerful “Hello, welcome to MonkeyTaco.“
Small step for robotics. Enormous step for our laptop’s social skills.
Before We Dive In: How Robots Actually Move (And Why It Matters Here)
Our laptop robot doesn’t have wheels or arms yet. But understanding how robots make decisions is worth a quick detour — because the same logic applies whether your robot is a laptop or a $50,000 surgical assistant.
Every self-moving robot operates on a core loop of five steps:
1. Learn to Move
Before anything else, the robot needs to know how to move. Like a baby learning to stand before learning to walk. Motors, wheels, joints — whatever the robot uses, it has to master the basics first.
2. Perception
The robot uses its sensors to scan the environment. What’s out there? Where are the obstacles? Who just walked in?
3. Localization
Based on sensor data, the robot figures out where it is. Not just what’s around it — but its own position in space.
4. Planning
Given its current location and its goal, the robot calculates the best path forward.
5. Control
The plan becomes action. Signals go to the motors. The robot moves.
After that first step, steps 2 through 5 repeat in a continuous loop — perceive, locate, plan, act. Over and over, many times per second.
Here’s the full picture:
Learn to Move → Perception → Localization → Planning → Control → [repeat from Perception]
A real-world example: your robot vacuum at home uses sensors to scan the room (Perception), figures out where it is relative to the furniture (Localization), calculates a cleaning path around the coffee table (Planning), and drives its wheels and brushes accordingly (Control). Then immediately starts the loop again.
Our laptop robot doesn’t move yet. But it does perceive — and today, we’re adding the reaction step. It sees a person. It responds. Simple loop. Real robotics principle.
What We’re Building
When the webcam detects a person, the robot plays an audio file — in our case, “Hello, welcome to MonkeyTaco.“
That’s it. Clean, simple, and surprisingly satisfying when it actually works.
Step 1: Get Your Audio File
Our robot needs something to say. You have two options:
Option A: Record yourself. Works fine. A bit lo-fi. Totally valid.
Option B: Use a free Text-to-Speech service. Much cleaner result. Go to a site like Free TTS, type your message — “Hello, welcome to MonkeyTaco” — click Generate, and download the .mp3 file.
One important note: always check the terms of use on any free TTS service, even for personal projects. Most free tiers are fine for non-commercial use, but it’s worth a quick read.
Once downloaded, rename the file to something simple — free TTS services tend to generate filenames that look like a robot sneezed on a keyboard. Something like welcome.mp3 works perfectly.
Step 2: Put the Audio File in the Right Place
Copy your .mp3 file into the same folder as your Python project. If you’ve been following along and haven’t changed any default settings in PyCharm, that folder should look something like this:
C:\Users\YourName\PycharmProjects\PythonProject
The code needs to find the file by name. If it’s in the right folder, you just reference it as "welcome.mp3” — no full path needed.
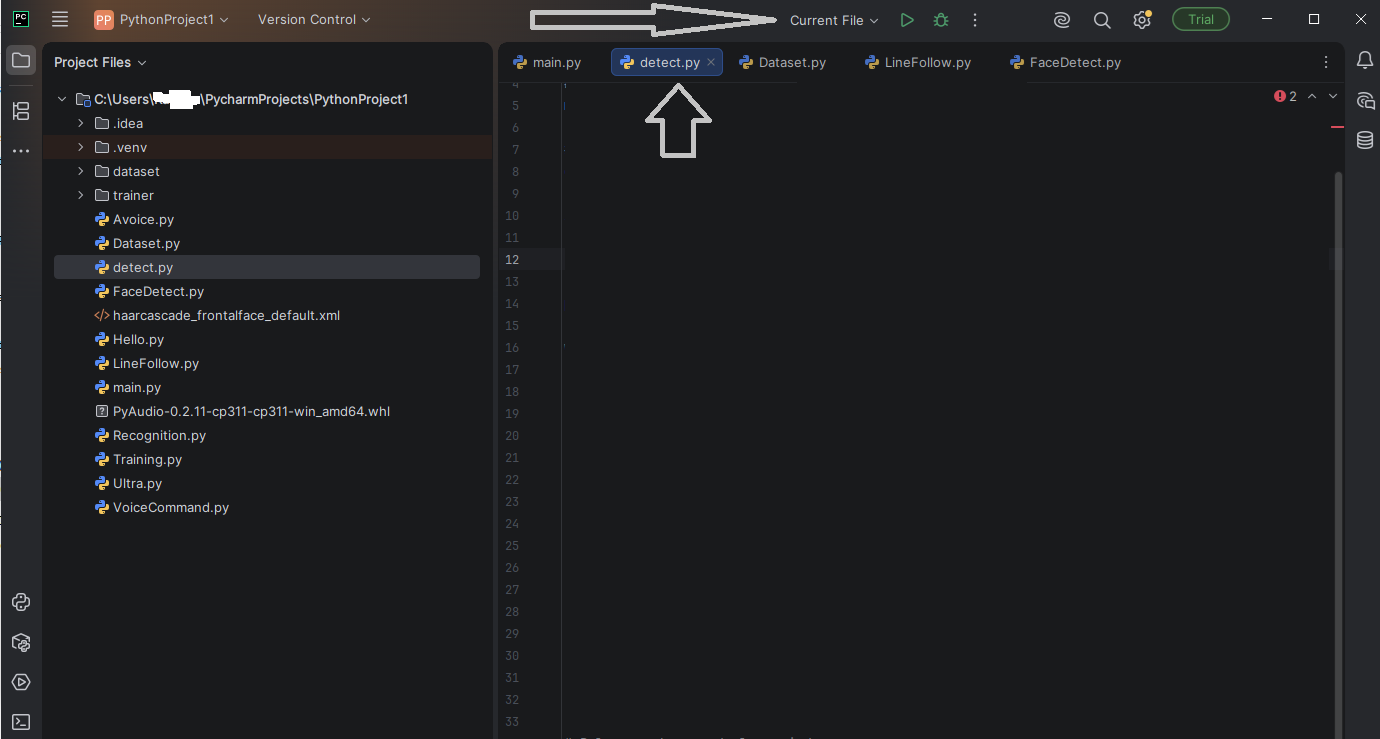
Step 3: Create a New Python File
Open PyCharm. In the left panel, right-click on your project folder and select New → Python File. Name it something like detectReact.
You’ll get a blank file. Good. We’re starting clean.
Next, open the PyCharm Terminal, and install the necessary libraries:
pip install opencv-python ultralytics pyttsx3
Step 4: The Code
Paste this into your new file:
import cv2
import time
from ultralytics import YOLO
import pygame

# Initialize pygame audio
pygame.mixer.init()

# --- Settings ---
SOUND_FILE = "welcome.mp3"       # Your audio file (must be in the project folder)
TARGET_OBJECT = "person"          # What to detect
CONFIDENCE_THRESHOLD = 0.60       # Only react if model is >60% sure
COOLDOWN_SECONDS = 5              # Minimum seconds between alerts

# Load the YOLOv8 nano model
model = YOLO("yolov8n.pt")

# Open webcam
cap = cv2.VideoCapture(0)
if not cap.isOpened():
    print("Could not open webcam")
    exit()

last_alert_time = 0
print(f"MonkeyTaco is watching... Looking for: {TARGET_OBJECT}. Press 'q' to quit.")

while True:
    ret, frame = cap.read()
    if not ret:
        break

    results = model(frame)
    detected_target = False

    for result in results:
        for box in result.boxes:
            cls = int(box.cls[0])
            class_name = model.names[cls]
            confidence = float(box.conf[0])

            # Only react if it's the right object AND confidence is high enough
            if class_name == TARGET_OBJECT and confidence > CONFIDENCE_THRESHOLD:
                detected_target = True
                break

    current_time = time.time()
    if detected_target:
        if not pygame.mixer.music.get_busy() and (current_time - last_alert_time) > COOLDOWN_SECONDS:
            pygame.mixer.music.load(SOUND_FILE)
            pygame.mixer.music.play()
            last_alert_time = current_time
            print(f"Hello! Person detected with confidence > {CONFIDENCE_THRESHOLD}")

    # Display the annotated video feed
    annotated_frame = results[0].plot()
    cv2.imshow("MonkeyTaco — React Mode", annotated_frame)

    if cv2.waitKey(1) & 0xFF == ord("q"):
        break

cap.release()
cv2.destroyAllWindows()
Hit Run. Step in front of the webcam. Your robot will say hello.
Press q or the red Stop button to quit.
Wait — Why Is It Shouting Nonstop?
If you tested an earlier version of this code (or wrote your own), you may have noticed a small problem: the robot detects a person and immediately loses all composure — playing the alert over and over again, relentlessly, without pause, like a smoke alarm with an existential crisis.
That’s because the original code had no rules. No standards. No boundaries.
Two fixes were needed:
Fix 1: Confidence threshold
The original code triggered on any detection, including when the model was only 50% sure it saw a person. YOLOv8 nano is fast and lightweight, but that comes at a cost — it can be a little jumpy.
The fix: only react when the model is more than 60% confident.
if class_name == TARGET_OBJECT and float(box.conf[0]) > 0.60:
Fix 2: Cooldown timer
Even with a real person standing in front of the webcam, playing the alert 30 times per second is not a feature. It’s a complaint waiting to happen.
The fix: a minimum 5-second gap between alerts.
if not pygame.mixer.music.get_busy() and (current_time - last_alert_time) > COOLDOWN_SECONDS:
Both fixes are already included in the code above. But it’s worth understanding why they’re there — because you’ll run into the same issues in almost every robotics project you build. Sensors and models are imperfect. The code around them needs to compensate.
What Just Happened?
You built a robot that completes a real perception-reaction loop:
- Perceive: Webcam captures frames, YOLOv8 scans for a person
- Decide: Is it actually a person? Is the model confident enough? Has enough time passed?
- React: Play the audio greeting
That decision logic — sense, evaluate, respond — is the same logic running inside robots that navigate hospital corridors, monitor patients overnight, and assist in surgeries. The hardware is different. The principle is identical.
A Few Things to Try
Before moving on, experiment a little:
- Change
TARGET_OBJECTfrom"person” to"cell phone” — make your robot greet your phone instead - Lower
CONFIDENCE_THRESHOLDto0.45and watch the false positives appear - Raise
COOLDOWN_SECONDSto10if the alerts feel too frequent - Record a different audio file — maybe something more useful than a greeting
Want to see the full list of 80 objects YOLOv8 can detect? Run this in a new Python file:
from ultralytics import YOLO
model = YOLO('yolov8n.pt')
print(model.names)
What’s Next?
Our robot can see. It can react. But right now, it only knows one thing to say — and it says the same thing regardless of what it detects.
What if it could react differently depending on the object? Greet a person one way, flag an unattended bag another way, log a detected fall silently?
That’s where we’re headed next: building a robot that doesn’t just react, but responds intelligently — different actions for different detections. Same webcam. Same laptop. Significantly more useful.